Usage
Open project overview
Virtual Developer Cloud-Connector for Eclipse has a single view to control projects and the execution of remote generator(s). Please open the Project overview Eclipse view by using the menu Window -> Show View -> Other… and select the Project overview under the Virtual Developer folder.

The view will open and a background task will start reading the project setup from the Virtual Developer platform. To do this the task will request the user credentials by opening a dialog.
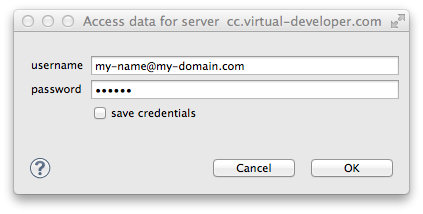
Please insert your user credentials into the dialog and press the OK button. If you’d like to save your credentials for using it after an Eclipse restart select the save credentials check box. If not selected, your credentials will be kept until you restart Eclipse.
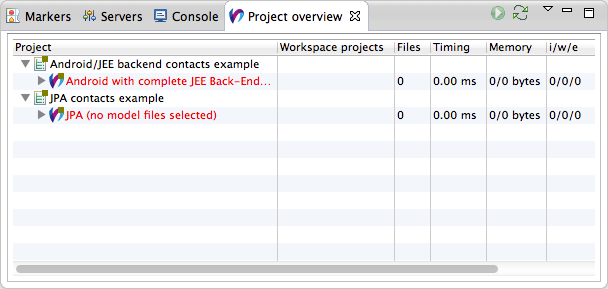
After loading your configured projects from Virtual Developer platform, you should see something like the following screenshot.
Reload project configuration from Virtual Developer portal
You’ll find the reload icon  in the tool bar in the upper right. You also may use the Reload menu
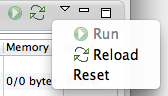
to load the current project configuration from Virtual Developer portal.
While load the configuration some older projects may disappear from the Project overview some new ones will show up in your Project overview. In case you’re invited to a friends project this project will show up as well. Also changes in the generator setup will show up right away.
Reset the remote generator
In cases you need to reset the generator in the cloud - for what reason ever - you may use the Reset command in the menu of the toolbar. In normal production you’d never use this command since it will reset the generator in the cloud and destroy the state of your current generator cache. Please use this command with care since it will cause higher data load.
Local setup
After loading your current setup from Virtual Developer portal you need to setup new or modified projects.
Model selection
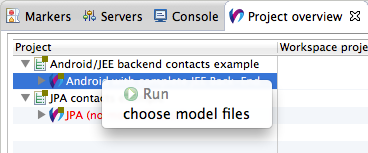
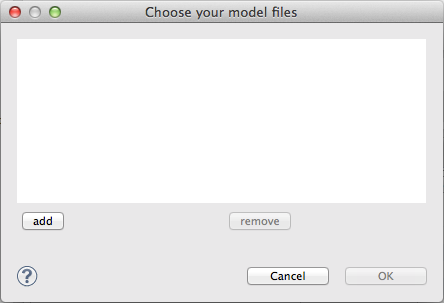
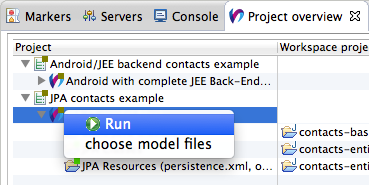
Let’s start with the selection of your model files sending to the generator in the cloud. Choose your model files while right click the generator you’d like to use and select the choose model files menu item from the context menu.
In the now opening dialog you can add/remove new model files to the list of models. Use the add button to add one or more model files from the eclipse workspace. Selected files in the list may be remove from the list with the remove button. If you are satisfied with the model list use the OK _button to leave this view. Use the _Cancel button to keep your old list of models.
Project mapping
All generators provide one or more so called virtual project(s). A virtual project is used to group related generation artifacts (source files) together. This is a common scenario in multi tier project development (e.g. one project for backend, one for persistence, one for GUI, …). Now you need to setup the mapping between the virtual project(s) of the generator and your local projects within your Eclipse workspace. To add a mapping to a virtual project please double click the column next to the a virtual project.
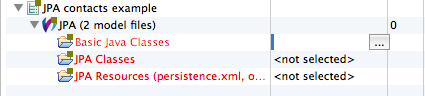
A small button shows up which will open the project selection when clicking on it. Please choose and select an already existing project from your eclipse workspace in the dialog and use the OK button to use your local project as a target for all files related to the virtual project in the generator. Please repeat this step for all virtual projects of the generator. Of course, you can map different virtual projects to a single local workspace project.
Start generation
After setting up the project you are ready for starting generation. Just select a project or a single generator of a project and the start button  in the tool bar will become enabled. Pressing this button will start the generation right away. Please wait until all Virtual Developer jobs are finished and all generated files are written to your local Eclipse workspace. The start generation command is also available by right click on a generator or project. You’ll find the command in the context menu.
You’ll find all generated source files in your local Eclipse workspace projects. Please validate them and change your model by your needs. After starting the generation again your model changes will show up in your local artifacts right after all Virtual Developer jobs are finished.
Note
In case your model changes in a way the generator will not write one or more files again they will not be deleted automatically at the moment. You need to delete them manually.